


Jvs Arcade Boards Arcade Machine Game Play
JVS arcade boards were the next advancement in arcade wiring since the late 1990s. It’s a serial protocol that makes arcade hardware close to plug and play: connect a single cable (USB, etc) from your cabinet’s I/O board to your new arcade board, and you get all of your controls and coin slots connected at once. As time has passed, the older system has moved away from using every wire on the Jamma pinout, as all modern release arcade game boards support HDMI, or, no longer need -5 volts to operate.
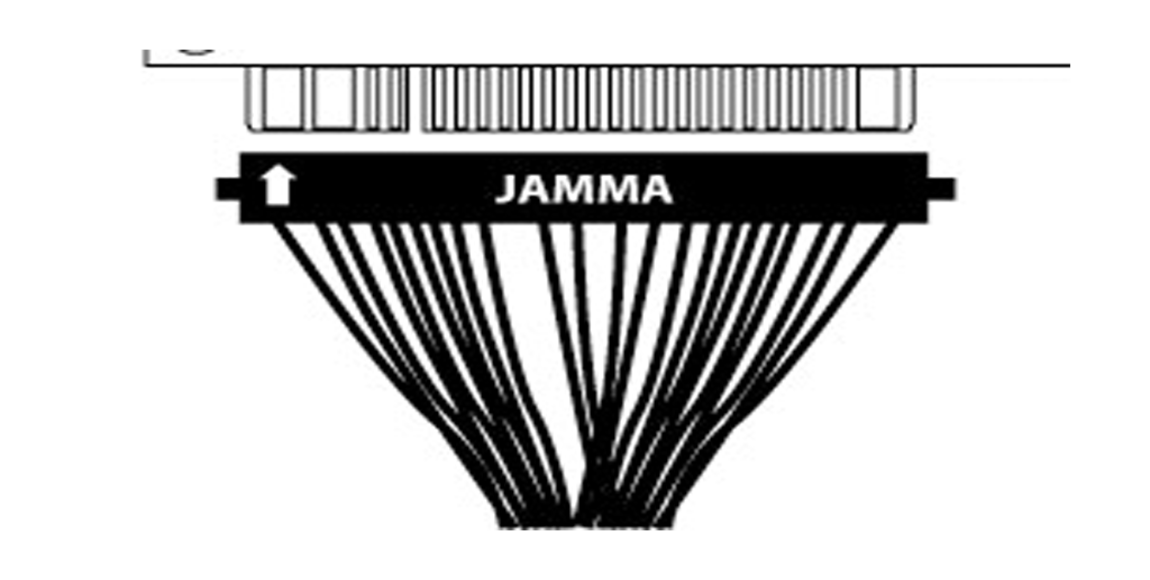
Arcooda machines use a variety of JAMMA wiring harnesses as there is no one system fits all. The default wiring harness in an Arcooda machine is a variation of the JAMMA wiring that supports most “combo boards”. A standard Jamma harness for example normally has pin 26 not connected, and, pins 27 and 28 connected to ground. The Arcooda Jamma harness has pins 26, 27 connected to buttons, allowing you to connect almost all combo game boards to your machine, as well as most arcade Jamma game boards.
If however you want to run much older system Jamma game boards that use -5volt voltage, or games that need ground on pins 27 and 28 on the Jamma wiring , please exchange the default harness to the -5volt harness setup (optional extra).
It is very important when installing your IO board into the JAMMA edge connector is facing you and that the game board is correctly positioned when plugging into the cabinet. On Arcooda products, there will always be a TOP label on the edge connector for easy reference. Please make sure the machine is turned off when exchanging game boards.
Also please take care to align the pins of the JAMMA edge connector with the game board. If you “cross pin” the harness into your game board or IO board there is VERY high chance of damaging your game board/machine.
Please note, depending on your Arcooda machine, you may need to purchase various add-on kits (power supply, IO board, etc). Each machine maybe slightly different - please consult your machine manual or talk with Arcooda team for advice.
Step 1. The JVS add on kit will come with its own wiring harness for easy setup. The harness will be connected to your JVS board, with the joystick/buttons harnesses going to your top control panel. Normally, you will have 2 sets of harnesses (one from the JAMMA board, the 2nd harness from your Game Wizard I/O board if purchased) coming from the machine to your joystick control panel. When you order the JVS add-on kit, there will now be a 3rd harness that goes into your joystick control panel. Please connect this harness to your control panel - this will now allow joystick/buttons play from your JVS IO board.
Step 2. From your JVS board (or game board), connect either the VGA, DVI, or HDMI video to the Arcooda monitor.
Step 3. From your JVS board (or game board), connect the audio via the 3.5mm or the RCA jacks to the Arcooda amplifier/subwoofer.
Step 4. From your JVS board, connect the power cables to the Arcooda power supply.
Step 5. Connect your game board power to the Arcooda machine power board. Please take care of the voltage setup of your machine and game board.
WARNING: Please always turn off your Arcooda machine when changing game boards, IO boards or harnesses/plugs.
EVEN BIGGER WARNING: Arcade game boards are complicated and one solution DOES NOT fit all applications. Some technicial knowledge is needed if you are using JVS systems, especially when running different factory game boards. Please check the game board's manual for the pinouts, voltages and cable settings before powering the machine. We have had many instances of customers thinking the adjustable voltage power supply might be the volume control and "cooking" their JVS boards. Please take care, or, hire an experience arcade technician to teach you all the aspects of JVS gaming including helpful hints.
Setup Instruction
Arcade Machine That Support JVS Arcade Boards

The Tempest sitdown arcade machine is a premium steel cabinet with gaming monitor designed for arcade gamers. It features a 32 inch 15/31khz + 1080P HD LCD Monitor, Japanese Sanwa joystick and buttons, JAMMA arcade wiring system, 2.1 sound system, full cabinet lighting effects, with easy upgrades.

Game Wizard Xtreme 3.0 is our most advanced joystick arcade machine to date. Built for dedicated gamers, the Xtreme 3.0 is an industry-leading step forward in arcade gaming for both home and commercial use. This machine creates a true arcade experience with 1ms HD gaming monitor, Sanwa joystick and buttons, 2.1 audio sound system with subwoofer, Jamma, JVS arcade and full console/PC support.

The Game Wizard Mercury 2.0 is a sleek and compact arcade option packing all of the advanced Arcooda features into one versatile cabinet. The Mercury combines arcade/pc/console plug and play capability with a 24" touch screen and accessible USB ports for an infinite combination of gaming options.

Enjoy traditional arcade gaming, console gaming, VR, gun shooting and more with the Tempest 32inch arcade cabinet upright. This premium steel cabinet is designed for arcade gamers and features a 32 inch 15/31khz + 1080P HD LCD Monitor, Japanese Sanwa joystick and buttons, 2.1 sound system, full cabinet lighting effects, with easy upgrades.

Arcooda's Game Wizard for Android is much more than a two-player arcade machine. It is a hub of endless entertainment. Gaming, social media, music and video streaming - touchscreen, joystick, console controller, supports ALL current consoles, PC as well as Jamma game boards. The machine ships with Android motherboard, just add your PC, Playstation, XBOX or Jamma arcade game boards for endless gaming options.

